Zimbra Mail Server Konfigurasi Domain
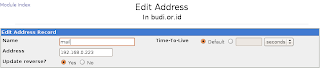
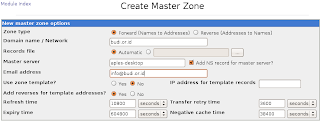

 Instalasi Paket Ubuntu
apt-get install binutils cpp fetchmail flex gcc libarchive-zip-perl libc6-dev libgmp3c2 libstdc++5 libltdl3 libcompress-zlib-perl libdb4.3-dev libpcre3 libpopt-dev lynx m4 make ncftp nmap openssl perl perl-modules unzip zip zlib1g-dev autoconf automake1.9 libtool bison autotools-dev g++
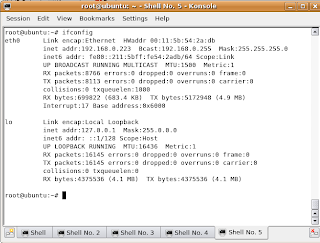
Konfigurasi Hostnameroot@ubuntu:# vim /etc/hosts
ISI FILE
192.168.0.223 mail.budi.or.id mail
127.0.0.1 localhost.localdomain localhost
#127.0.0.1 localhost
#127.0.1.1 ubuntu
root@ubuntu:# hostname mail.budi.or.id
root@ubuntu:# vim /etc/sysctl.conf
kernel.hostname = mail.budi.or.id
kernel.domainname = budi.or.id
root@ubuntu:# reboot
Instalasi Zimbra Mail Serverroot@ubuntu:/opt# cd zcs-5.0.16_GA_2921.UBUNTU8.20090429045342/
root@ubuntu:/opt/zcs-5.0.16_GA_2921.UBUNTU8.20090429045342# ./install.sh
Select the packages to install
Install zimbra-ldap [Y] y
Install zimbra-logger [Y] y
Install zimbra-mta [Y] y
Install zimbra-snmp [Y] y
Install zimbra-store [Y] y
Install zimbra-apache [Y] y
Install zimbra-spell [Y] y
Install zimbra-proxy [N] y
Checking required space for zimbra-core
checking space for zimbra-store
Installing:
zimbra-core
zimbra-ldap
zimbra-logger
zimbra-mta
zimbra-snmp
zimbra-store
zimbra-apache
zimbra-spell
zimbra-proxy
The system will be modified. Continue? [N] yInstalling packages
zimbra-core......zimbra-core_5.0.16_GA_2921.UBUNTU8_i386.deb...done
zimbra-ldap......zimbra-ldap_5.0.16_GA_2921.UBUNTU8_i386.deb...done
zimbra-logger......zimbra-logger_5.0.16_GA_2921.UBUNTU8_i386.deb...done
zimbra-mta......zimbra-mta_5.0.16_GA_2921.UBUNTU8_i386.deb...done
zimbra-snmp......zimbra-snmp_5.0.16_GA_2921.UBUNTU8_i386.deb...done
zimbra-store......zimbra-store_5.0.16_GA_2921.UBUNTU8_i386.deb...done
zimbra-apache......zimbra-apache_5.0.16_GA_2921.UBUNTU8_i386.deb...done
zimbra-spell......zimbra-spell_5.0.16_GA_2921.UBUNTU8_i386.deb...done
zimbra-proxy......zimbra-proxy_5.0.16_GA_2921.UBUNTU8_i386.deb...done
Operations logged to /tmp/zmsetup.05052009-230143.log
Setting defaults...hostname: Unknown host
No results returned for A lookup of
Checked nameservers:
192.168.0.71
DNS ERROR resolving
It is suggested that the hostname be resolveable via DNS
Change hostname [Yes] yes
Please enter the logical hostname for this host mail.budi.or.id
DNS ERROR resolving MX for mail.budi.or.id
It is suggested that the domain name have an MX record configured in DNS
Change domain name? [Yes] no
done.
Checking for port conflicts
Merubah Password AdministratorMain menu
1) Common Configuration:
2) zimbra-ldap: Enabled
3) zimbra-store: Enabled
+Create Admin User: yes
+Admin user to create: admin@mail.budi.or.id
******* +Admin Password UNSET
+Enable automated spam training: yes
+Spam training user: spam.b4epxd7i@mail.budi.or.id
+Non-spam(Ham) training user: ham.iqusytqw@mail.budi.or.id
+Global Documents Account: wiki@mail.budi.or.id
+SMTP host: mail.budi.or.id
+Web server HTTP port: 80
+Web server HTTPS port: 443
+Web server mode: http
+IMAP server port: 7143
+IMAP server SSL port: 7993
+POP server port: 7110
+POP server SSL port: 7995
+Use spell check server: yes
+Spell server URL: http://mail.budi.or.id:7780/aspell.php
4) zimbra-mta: Enabled
5) zimbra-snmp: Enabled
6) zimbra-logger: Enabled
7) zimbra-spell: Enabled
8) zimbra-proxy: Enabled
9) Default Class of Service Configuration:
r) Start servers after configuration yes
s) Save config to file
x) Expand menu
q) Quit
Address unconfigured (**) items (? - help) 3 Store configuration
1) Status: Enabled
2) Create Admin User: yes
3) Admin user to create: admin@mail.budi.or.id
** 4) Admin Password UNSET
5) Enable automated spam training: yes
6) Spam training user: spam.b4epxd7i@mail.budi.or.id
7) Non-spam(Ham) training user: ham.iqusytqw@mail.budi.or.id
8) Global Documents Account: wiki@mail.budi.or.id
9) SMTP host: mail.budi.or.id
10) Web server HTTP port: 80
11) Web server HTTPS port: 443
12) Web server mode: http
13) IMAP server port: 7143
14) IMAP server SSL port: 7993
15) POP server port: 7110
16) POP server SSL port: 7995
17) Use spell check server: yes
18) Spell server URL: http://mail.budi.or.id:7780/aspell.php
Select, or 'r' for previous menu [r] 4 Password for admin@mail.budi.or.id (min 6 characters): [uAwGckCGX] ardelindo
Store configuration
1) Status: Enabled
2) Create Admin User: yes
3) Admin user to create: admin@mail.budi.or.id
4) Admin Password set
5) Enable automated spam training: yes
6) Spam training user: spam.b4epxd7i@mail.budi.or.id
7) Non-spam(Ham) training user: ham.iqusytqw@mail.budi.or.id
8) Global Documents Account: wiki@mail.budi.or.id
9) SMTP host: mail.budi.or.id
10) Web server HTTP port: 80
11) Web server HTTPS port: 443
12) Web server mode: http
13) IMAP server port: 7143
14) IMAP server SSL port: 7993
15) POP server port: 7110
16) POP server SSL port: 7995
17) Use spell check server: yes
18) Spell server URL: http://mail.budi.or.id:7780/aspell.php
Select, or 'r' for previous menu [r] r
Main menu
1) Common Configuration:
2) zimbra-ldap: Enabled
3) zimbra-store: Enabled
4) zimbra-mta: Enabled
5) zimbra-snmp: Enabled
6) zimbra-logger: Enabled
7) zimbra-spell: Enabled
8) zimbra-proxy: Enabled
9) Default Class of Service Configuration:
r) Start servers after configuration yes
s) Save config to file
x) Expand menu
q) Quit
*** CONFIGURATION COMPLETE - press 'a' to apply
Select from menu, or press 'a' to apply config (? - help) a
Save configuration data to a file? [Yes] Yes
Save config in file: [/opt/zimbra/config.22384]
Saving config in /opt/zimbra/config.22384...done.
The system will be modified - continue? [No] yes
Operations logged to /tmp/zmsetup.05052009-230143.log
Setting local config values...done.
Setting up CA...done.
Deploying CA to /opt/zimbra/conf/ca ...done.
Creating SSL certificate...done.
Installing mailboxd SSL certificates...done.
Initializing ldap...done.
Setting replication password...done.
Setting Postfix password...done.
Setting amavis password...done.
Setting nginx password...done.
Saving CA in ldap ...done.
Creating server entry for mail.budi.or.id...done.
Saving SSL Certificate in ldap ...done.
Setting spell check URL...done.
Setting service ports on mail.budi.or.id...done.
Adding mail.budi.or.id to zimbraMailHostPool in default COS...done.
Installing skins...
beach
bare
hotrod
lavender
yahoo
lemongrass
sand
bones
steel
zmail
sky
waves
done.
Setting zimbraFeatureIMEnabled=FALSE...done.
Setting zimbraFeatureTasksEnabled=TRUE...done.
Setting zimbraFeatureBriefcasesEnabled=TRUE...done.
Setting zimbraFeatureNotebookEnabled=TRUE...done.
Setting MTA auth host...done.
Setting TimeZone Preference...done.
Creating domain mail.budi.or.id...done.
Creating user admin@mail.budi.or.id...done.
Creating postmaster alias...done.
Creating user wiki@mail.budi.or.id...done.
Creating user spam.qccqg9vk5@mail.budi.or.id...done.
Creating user ham.vsjz6qiwt@mail.budi.or.id...done.
Setting spam training accounts...done.
Initializing store sql database...done.
Setting zimbraSmtpHostname for mail.budi.or.id...done.
Initializing logger sql database...done.
Initializing mta config...done.
Configuring SNMP...done.
Setting services on mail.budi.or.id...done.
Setting up syslog.conf...done.
You have the option of notifying Zimbra of your installation.
This helps us to track the uptake of the Zimbra Collaboration Suite.
The only information that will be transmitted is:
The VERSION of zcs installed (5.0.16_GA_2921_UBUNTU8)
The ADMIN EMAIL ADDRESS created (admin@mail.budi.or.id)
Notify Zimbra of your installation? [Yes] no
Notification skipped
Starting servers...
done.
Checking for deprecated zimlets...done.
Installing common zimlets...
com_zimbra_bulkprovision...done.
com_zimbra_local...done.
com_zimbra_ymemoticons...
done.
com_zimbra_url...
done.
com_zimbra_date...
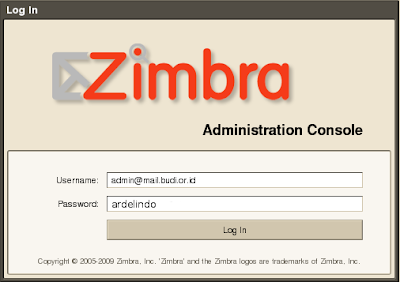
Administrasi Zimbra Mail Serverhttps://IP_SERVER_ZIMBRA:7071
1. Masukan Username Administrator Zimbra
Username : admin@mail.budi.or.id
Password : ardelindo
Klik ... Log In