A data center is a facility used to house computer systems and associated components, such as telecommunications and storage systems. It generally includes redundant or backup power supplies, redundant data communications connections, environmental controls (e.g., air conditioning, fire suppression) and security devices.
Datacenter merupakan pusat penyimpanan data, terdiri dari server, power supply backup, perangkat backup data dan perangkat keamanan fisik server. Kebanyakan perusahaan membangun datacenter untuk penyimpanan data dan pengamanan. Apabila terjadi kerusakan pada komputer desktop, maka data dapat dipulihkan kembali secara cepat.
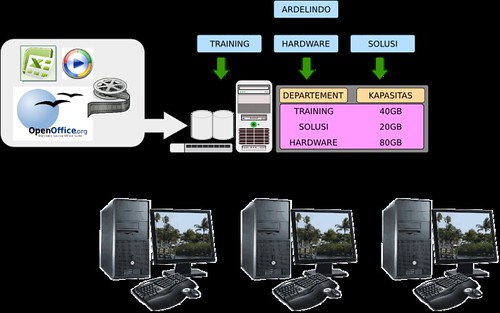
Akhir - akhir ini perusahaan yang menggunakan datacenter mengalami peningkatan, datacenter tidak lagi dipergunakan hanya untuk penyimpanan data terpusat, tetapi untuk :
1. mobilitas data
data dapat diakses dari internet melalui perangkat laptop, hp maupun pda
2. Koordinasi pekerjaan
file dapat diakses bersama - sama oleh beberapa pengguna dalam satu departemen
Aplikasi Datacenter
Fungsi utama datacenter adalah untuk melakukan penyimpanan data secara terpusat dengan aktifitas baca tulis yang tinggi. Selain untuk media penyimpanan, datacenter harus memiliki kemampuan melakukan authentifikasi pengguna serta alokasi quota data.
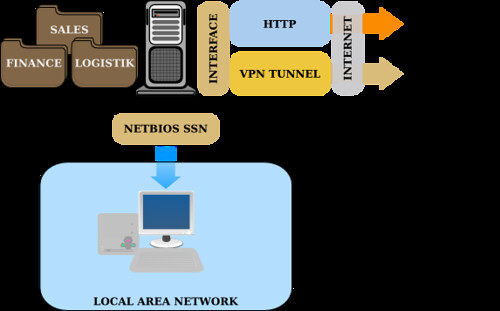
Kelebihan datacenter berbasis aplikasi server filesharing SAMBA, kita dapat mengizinkan beberapa pengguna dalam group meng-edit file, file yang terhapus secara otomatis dibuatkan backup oleh modul recycle bin. Selain itu kita juga dapat mengelola extension file yang disimpan pada datacenter, hal ini diperlukan untuk mencegah komputer desktop yang terkena virus menyimpan file virus ke dalam server. Aplikasi datacenter terdiri dari:
1. Samba Fileserver
Aplikasi server yang menyediakan layanan pertukaran file melalui protokol NetBIOS. Samba dapat kita tambahkan plugin recycle bin, antivirus scanner dan debug log monitoring
2. OpenLDAP
OpenLDAP yang terintegrasi dengan Samba berfungsi untuk authentifikasi pengguna. Integrasi OpenLDAP memiliki kelebihan daripada authenfikasi biasa, beberapa fileserver (sub fileserver) bisa kita jadikan satu authentifikasi dengan openLDAP. Sehingga memberikan kemudahan pengelolaan pengguna dan group.
3. SSL Bridge
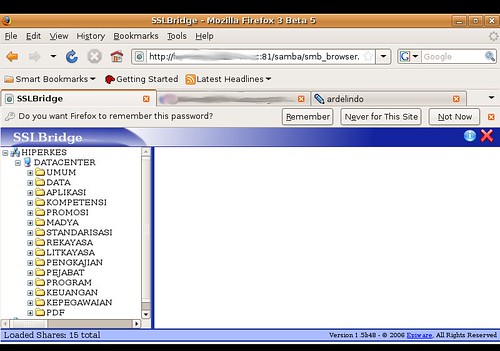
SSL bridge adalah aplikasi antarmuka SAMBA fileserver berbasis PHP, dengan adanya SSL Bridge pengguna dapat mengakses file datacenter, baik upload maupun download file.
4. OpenVPN
Antarmuka pengguna
The user interface (also known as Human Computer Interface or Man-Machine Interface (MMI)) is the aggregate of means by which people—the users—interact with the system—a particular machine, device, computer program or other complex tool. The user interface provides means of:
* Input, allowing the users to manipulate a system
* Output, allowing the system to indicate the effects of the users' manipulation.
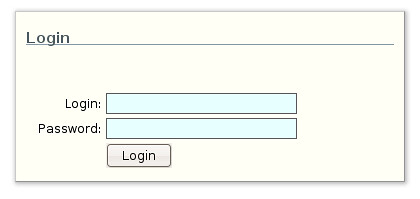
Authentifikasi Pengguna
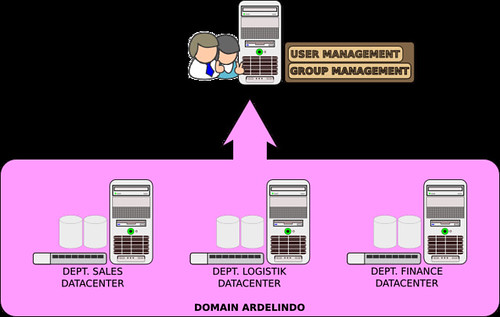
Samba LDAP
apt-get install slapd ldap-utils migrationtools
dpkg-reconfigure slapd
/etc/init.d/slapd restart
apt-get install samba smbldap-tools smbclient samba-doc
cp /usr/share/doc/samba-doc/examples/LDAP/samba.schema.gz /etc/ldap/schema/
gzip -d /etc/ldap/schema/samba.schema.gz
Konfigurasi LDAP
vim /etc/ldap/slapd.conf
#Di tambahkan
include /etc/ldap/schema/samba.schema
include /etc/ldap/schema/misc.schema
suffix “dc=ardelinux,dc=com”
roodn “cn=admin,dc=ardelinux,dc=com”
rootpw 1111
# ACL yang berikut ini diganti:
access to attribute=userPassword
# Dengan:
access to attrs=userPassword,sambaNTPassword,sambaLMPassword
/etc/init.d/slapd restart
#Buat file ardelinux.ldif sebagai root ldap
dn: dc=ardelinux,dc=com
objectClass: top
objectClass: dcObject
objectClass: organization
dc: Ardelinux
o: Training
description: PT. Ardelindo Aples
#Tambah isi LDIF ke ldap server
ldapadd -f ardelinux.ldif -x -D 'cn=admin,dc=ardelinux,dc=com' -W
Password: 1111
cd /etc/samba/
cp smb.conf smb.conf.original
Konfigurasi samba smb.conf
vim smb.conf
workgroup = ARDELINUX
security = user
passdb backend = ldapsam:ldap://localhost/
obey pam restrictions = no
#######################################################################
#COPY AND PASTE THE FOLLOWING UNDERNEATH "OBEY PAM RESTRICTIONS = NO"
#######################################################################
#
# Begin: Custom LDAP Entries
#
ldap admin dn = cn=admin,dc=ardelinux,dc=com
ldap suffix = dc=ardelinux, dc=com
ldap group suffix = ou=Groups
ldap user suffix = ou=Users
ldap machine suffix = ou=Computers
ldap idmap suffix = ou=Users
; Do ldap passwd sync
ldap passwd sync = Yes
passwd program = /usr/sbin/smbldap-passwd %u
passwd chat = *New*password* %n\n *Retype*new*password* %n\n *all*authentication*tokens*updated*
add user script = /usr/sbin/smbldap-useradd -m "%u"
ldap delete dn = Yes
delete user script = /usr/sbin/smbldap-userdel "%u"
add machine script = /usr/sbin/smbldap-useradd -w "%u"
add group script = /usr/sbin/smbldap-groupadd -p "%g"
delete group script = /usr/sbin/smbldap-groupdel "%g"
add user to group script = /usr/sbin/smbldap-groupmod -m "%u" "%g"
delete user from group script = /usr/sbin/smbldap-groupmod -x "%u" "%g"
set primary group script = /usr/sbin/smbldap-usermod -g "%g" "%u"
domain logons = yes
master domain = yes
local master = yes
preferred master = yes
os level = 46
invalid users = root
#####################################################
#STOP COPYING HERE!
#####################################################
# Restart SAMBA.
/etc/init.d/samba restart
#Tambahkan password LDAP pada samba
smbpasswd -w 1111
Konfigurasi SMBLDAP-TOOLS
cd /usr/share/doc/smbldap-tools/examples/
cp smbldap_bind.conf /etc/smbldap-tools/
cp smbldap.conf.gz /etc/smbldap-tools/
gzip -d /etc/smbldap-tools/smbldap.conf.gz
cd /etc/smbldap-tools/
net getlocalsid
vim smbldap.conf
# Edit the file so that the following information is correct (according to your individual setup):
SID="S-1-5-21-949328747-3404738746-3052206637" ## This line must have the same SID as when you ran "net getlocalsid"
sambaDomain="ARDELINUX"
ldapTLS="0"
suffix="dc=example,dc=local"
sambaUnixIdPooldn="sambaDomainName=EXAMPLE,${suffix}"
userSmbHome=
userProfile=
userHomeDrive=
userScript=
mailDomain="ardelinux.com"
vim smbldap_bind.conf
# Edit the file so that the following information is correct (according to your individual setup):
slaveDN="cn=admin,dc=ardelinux,dc=com"
slavePw="1111"
masterDN="cn=admin,dc=ardelinux,dc=com"
masterPw="1111"
# Set the correct permissions on the above files:
chmod 0644 /etc/smbldap-tools/smbldap.conf
chmod 0600 /etc/smbldap-tools/smbldap_bind.conf
Populate LDAP using smbldap-tools
# Execute the command to populate the directory.
smbldap-populate -u 30000 -g 30000
# At the password prompt assign your root password:
1111
# Verify that the directory has information in it by running the command:
ldapsearch -x -b dc=ardelinux,dc=com | less
Penambahan user LDAP ke samba
# Add the user to LDAP
smbldap-useradd -a -m -M ricky -c "Richard M" ricky
smbldap-useradd -w client-winxp
# Here is an explanation of the command switches that we used.
-a allows Windows as well as Linux login
-m makes a home directory, leave this off if you do not need local access
-M sets up the username part of their email address
-c specifies their full name
# Set the password the new account.
smbldap-passwd ricky
Konfigurasi Linux dengan OpenLDAP
# Install the necessary software for this to work.
apt-get install auth-client-config libpam-ldap libnss-ldap
# Answer the prompts on your screen with the following:
Should debconf manage LDAP configuration?: Yes
LDAP server Uniform Resource Identifier: ldapi://127.0.0.1
Distinguished name of the search base: dc=ardelinux,dc=com
LDAP version to use: 3
Make local root Database admin: Yes
Does the LDAP database require login? No
LDAP account for root: cn=admin,dc=ardelinux,dc=com
LDAP root account password: 1111
# Open the /etc/ldap.conf file for editing.
vim /etc/ldap.conf
# Configure the following according to your setup:
host 127.0.0.1
base dc=ardelinux,dc=com
uri ldap://127.0.0.1/
rootbinddn cn=admin,dc=ardelinux,dc=com
bind_policy soft
# Copy the /etc/ldap.conf file to /etc/ldap/ldap.conf
cp /etc/ldap.conf /etc/ldap/ldap.conf
# Create a new file /etc/auth-client-config/profile.d/open_ldap:
vim /etc/auth-client-config/profile.d/open_ldap
# Insert the following into that new file:
[open_ldap]
nss_passwd=passwd: compat ldap
nss_group=group: compat ldap
nss_shadow=shadow: compat ldap
pam_auth=auth required pam_env.so
auth sufficient pam_unix.so likeauth nullok
auth sufficient pam_ldap.so use_first_pass
auth required pam_deny.so
pam_account=account sufficient pam_unix.so
account sufficient pam_ldap.so
account required pam_deny.so
pam_password=password sufficient pam_unix.so nullok md5 shadow use_authtok
password sufficient pam_ldap.so use_first_pass
password required pam_deny.so
pam_session=session required pam_limits.so
session required pam_mkhomedir.so skel=/etc/skel/
session required pam_unix.so
session optional pam_ldap.so
# Backup the /etc/nsswitch.conf file:
cp /etc/nsswitch.conf /etc/nsswitch.conf.original
Backup the /etc/pam.d/ files:
cd /etc/pam.d/
mkdir bkup
cp * bkup/
# Enable the new LDAP Authentication Profile by executing the following
auth-client-config -a -p open_ldap
Reboot the server and test
ldconfig
id ricky
reboot


Tidak ada komentar:
Posting Komentar